Command Lines
Linux 
- 获取当前
bash pid:ps -p $$,获取fish-shell pid:ps -p $fish_pid - Commands for Manipulating The History
- https://www.gnu.org/software/bash/manual/html_node/Commands-For-History.html
- reverse-search-history (C-r)
- Read from standard input and write to standard output and files
echo "example" | tee path/to/file
ZSH
Environment: No Internet, no sudo root privilege.
Install ZSH under user directory. Download ZSH source code: https://sourceforge.net/projects/zsh/
-
Extract
xz -d zsh-5.9.tar.xz tar -xf zsh-5.9.tar cd zsh-5.9 -
Compile ZSH
./configure --prefix=/home/chenlu/.local/lib/zsh-5.9 make make install -
Create soft link
ln -s ~/.local/lib/zsh-5.9/bin/zsh ~/.local/bin/zsh
Install oh-my-zsh. Download oh-my-zsh source code: https://github.com/ohmyzsh/ohmyzsh
You can create a new zsh config file by copying the template that we have included for you.
cp ~/.oh-my-zsh/templates/zshrc.zsh-template ~/.zshrc
Install powerlevel10k. https://github.com/romkatv/powerlevel10k#how-do-i-install-powerlevel10k-on-a-machine-without-internet-access
-
Run this command on the machine without Internet access:
uname -sm | tr '[A-Z]' '[a-z]' -
Run these commands on a machine connected to the Internet after replacing the value of
target_unamewith the output of the previous command:target_uname="replace this with the output of the previous command" git clone --depth=1 https://github.com/romkatv/powerlevel10k.git ~/powerlevel10k GITSTATUS_CACHE_DIR="$HOME"/powerlevel10k/gitstatus/usrbin ~/powerlevel10k/gitstatus/install -f -s "${target_uname% *}" -m "${target_uname#* }" -
Copy
~/powerlevel10kfrom the machine connected to the Internet to the one without Internet access. -
Add
source ~/powerlevel10k/powerlevel10k.zsh-themeto~/.zshrcon the machine without Internet access:echo 'source ~/powerlevel10k/powerlevel10k.zsh-theme' >>~/.zshrc -
If
~/.zshrcon the machine without Internet access setsZSH_THEME, remove that line.sed -i.bak '/^ZSH_THEME=/d' ~/.zshrc
To update, remove ~/powerlevel10k on both machines and repeat steps 1-3.
mv ~/powerlevel10k ~/.oh-my-zsh/custom/themes/
ZSH_THEME="powerlevel10k/powerlevel10k"
GDB 
GNU is a recursive acronym for "GNU's Not Unix!".
gcc: GNU project C and C++ compiler
gdb: The GNU Debugger
使用gdb之前,通常使用gcc -g test.c编译文件,man gcc
-g  Produce debugging information in the operating system's native format (stabs, COFF, XCOFF, or DWARF).  GDB can work with this
           debugging information.

           On most systems that use stabs format, -g enables use of extra debugging information that only GDB can use; this extra information
           makes debugging work better in GDB but probably makes other debuggers crash or refuse to read the program.  If you want to control
           for certain whether to generate the extra information, use -gstabs+, -gstabs, -gxcoff+, -gxcoff, or -gvms (see below).
gdb中回车会默认执行上一次命令
-
helpType "help" followed by a class name for a list of commands in that class. Type "help all" for the list of all commands. Type "help" followed by command name for full documentation. -
file: Use FILE as program to be debugged. It is read for its symbols, for getting the contents of pure memory. -
listorl: List specified function or line. With no argument, lists ten more lines after or around previous listing. -
runorr: Start debugged program. You may specify arguments to give it. -
start: Start the debugged program stopping at the beginning of the main procedure. -
nextorn: Step over. Step program, proceeding through subroutine calls. -
stepors: Step into. Step program until it reaches a different source line. -
finish: Step out. Execute until selected stack frame returns. -
printorp: Print value of expression EXP. -
breakorb: Set breakpoint at specified location. -
infoori: Generic command for showing things about the program being debugged. -
info breakori b: Status of specified breakpoints. -
deleteord: Delete all or some breakpoints.
Git 
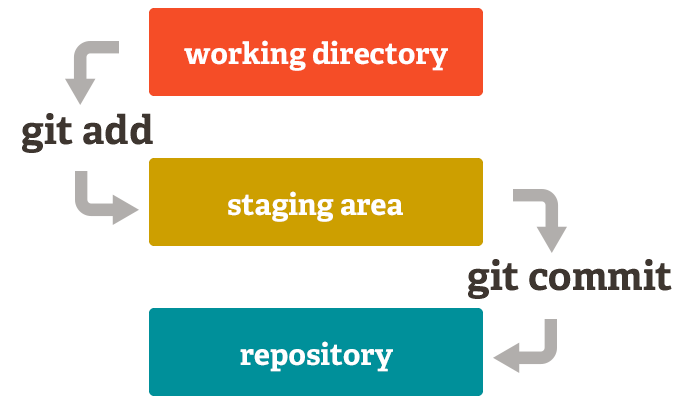
- working directory 工作区
- staging area 暂存区
- repository 版本库
创建仓库
git init当前目录git init dir指定目录
克隆仓库
git clone url默认目录名为仓库名git clone url dir克隆到指定目录git clone -b branchname url克隆指定分支,没有-b默认克隆 master 分支
设置提交代码时的用户信息
git config --global user.name "username"用户名git config --global user.email email@xxx.com邮箱
分支管理
git branch列出分支git branch branchname创建分支git branch -d branchname删除分支git checkout branchname切换指定分支git checkout -b branchname创新分支并立即切换git merge branchname合并分支到当前分支
提交与修改
git status查看当前的状态,显示有变更的文件git status -s简短输出git diff比较文件的不同,即暂存区和工作区的差异git diff filename指定文件git log查看提交历史git log --online简短输出git blame filename以列表形式查看指定文件的历史修改记录git add .添加所有文件到暂存区git commit -m "message"将暂存区内容提交到本地仓库中git commit -am "message"首先 add 所有修改的文件,再提交,新创建的文件不会被添加git reset --mixed commitID默认回退模式,可以不填--mixed,回退版本库,回退暂存区,保留工作区git reset --soft commitID只回退版本库,commit 的信息git reset --soft commitID回退所有信息,工作区源码也会回退
远程仓库
git remote查看远程仓库git remote -vverbose 显示更多信息git remote show remotename显示指定远程仓库的信息git remote add remotename url添加远程仓库git push remotename推送当前分支到远程仓库
FFmpeg 
- 查看 mkv 封装信息,
ffmpeg -i input.mkv - mkv 只分离视频为 mp4,
ffmpeg -i input.mkv -vcodec copy -an output.mp4 - mkv 只分离音频为 flac,
ffmpeg -i input.mkv -acodec copy -vn output.flac - flv 分离为 mp4,
ffmpeg -i input.flv -c copy output.mp4 - 提取 mp4 的音频为 mp3,
ffmpeg -i audio.mp4 -vn audio.wav/mp3 - 合并音频和视频文件,并使用 aac 重新编码音频文件,
ffmpeg -i video.mp4 -i audio.wav/mp3 -c:v copy -c:a aac output.mp4
Fish Shell 
-
Config file path
~/.config/fish/config.fish -
Oh my posh
oh-my-posh init fish --config ~/Documents/ohmyposh.json | source -
Vi mode
set fish_cursor_default block set fish_cursor_insert underscore # set fish_cursor_replace_one underscore # set fish_cursor_visual block -
iTerm2 shell integration
source ~/.iterm2_shell_integration.fish
Homebrew 
换阿里云源:https://developer.aliyun.com/mirror/homebrew,从阿里云下载安装脚本并安装 Homebrew
git clone https://mirrors.aliyun.com/homebrew/install.git brew-install
/bin/bash brew-install/install.sh
rm -rf brew-install
-
bash
echo 'export HOMEBREW_API_DOMAIN="https://mirrors.aliyun.com/homebrew-bottles/api"' >> ~/.bash_profile echo 'export HOMEBREW_BREW_GIT_REMOTE="https://mirrors.aliyun.com/homebrew/brew.git"' >> ~/.bash_profile echo 'export HOMEBREW_CORE_GIT_REMOTE="https://mirrors.aliyun.com/homebrew/homebrew-core.git"' >> ~/.bash_profile echo 'export HOMEBREW_BOTTLE_DOMAIN="https://mirrors.aliyun.com/homebrew/homebrew-bottles"' >> ~/.bash_profile source ~/.bash_profile brew update -
zsh
echo 'export HOMEBREW_API_DOMAIN="https://mirrors.aliyun.com/homebrew-bottles/api"' >> ~/.zshrc echo 'export HOMEBREW_BREW_GIT_REMOTE="https://mirrors.aliyun.com/homebrew/brew.git"' >> ~/.zshrc echo 'export HOMEBREW_CORE_GIT_REMOTE="https://mirrors.aliyun.com/homebrew/homebrew-core.git"' >> ~/.zshrc echo 'export HOMEBREW_BOTTLE_DOMAIN="https://mirrors.aliyun.com/homebrew/homebrew-bottles"' >> ~/.zshrc source ~/.zshrc brew update -
Search openjdk
brew search openjdk - Install openjdk
brew install openjdk - List services
brew services list - Start/Stop mysql service
brew services start/stop mysql
Docker 
-
Create and run a container with name "ubuntu", hostname "ubuntu", volume source "$PWD/CSAPP", destination "/CSAPP", using image ubuntu
docker run -it --name ubuntu --hostname ubuntu --platform linux/amd64 --volume "$PWD/CSAPP:/CSAPP" ubuntu /bin/bash -
See docker process
docker ps -a -
Container
- list:
docker container ls - remove:
docker container rm 2a56b6fa205b - start:
docker start -ia ubuntu - stop:
docker stop ubuntu
- list:
-
Image
- list:
docker image ls - pull:
docker pull ubuntu:latest - save:
docker save -o oracle-ee.tar repo:tag - load:
docker load -i oracle-ee.tar
- list:
Tmux 
Document: https://github.com/tmux/tmux/wiki/Getting-Started#getting-started
.tmux.conf
- The prefix key
C-b, Control + BC-for the control keyM-for the meta key (normallyAlton modern computers)S-for the shift key
- Help keys
C-b ? - Window operations
- Create
C-b c - Split horizontally
C-b s - Split vertically
C-b v
- Create
- Select pane
- Up
C-b k - Down
C-b j - Left
C-b h - Right
C-b l
- Up
- Copy mode and using vi movement
C-b [ - Display pane numbers
C-b q - Kill the active pane
C-b x - Resize pane by 5
- Up
C-b M-Up - Down
C-b M-Down - Left
C-b M-Left - Right
C-b M-Right
- Up
-
Run shell commands
runorrun-shell- e.g.
run pwd
-
Formats
- Document: https://github.com/tmux/tmux/wiki/Formats
- Display a format
tmux display -p #{} - e.g.
tmux display -p '#{pid}' - e.g.
tmux display -p '#{status-right}'